
Most people use Wi-Fi to connect to the internet using their phones. After getting online, your can communicate with your loved ones, get directions, play online games, browse for information and entertain yourself during leisure time. However, sometimes no internet issue may arise despite connecting your phone to Wi-Fi, which is disappointing more if you don’t understand what is causing it.
The issue denies you an opportunity of being online. What do you do when such an issue arises? If you are not aware of how you can fix it, this article covers ten ways you can try to solve this frustrating problem. The internet problems after connecting to the Wi-Fi can arise due to the following reasons:-
- Router issues
- Internet connection problems
- Date settings
No Internet After Connecting Android Phone to Wi-Fi (10 ways to fix)
Also Read: Unable to Download Apps in Android Phones from Play Store (7 ways to fix)
Here are the solutions you can use to troubleshoot your Wi-Fi connectivity and ensure that you get online without any disturbances;
Solution 1: Disconnect and Reconnect Wi-Fi Network
After encountering this disappointing error, the first thing is to forget your Wi-Fi and reconnect it. Forgetting the network clears all your network’s preferences. This solution solves most Wi-Fi connectivity problems despite being basic.
Follow this simple procedure:-
- Start the phone’s notification panel by dragging the screen downwards.
- Locate the Wi-Fi symbol and long-press it.
- Select the “Wi-Fi Network” you are using.

- Then tap on “Forget network”.
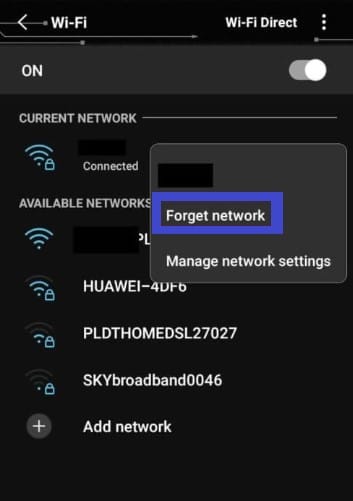
- Open your notification panel and select the Wi-Fi Network.
- Key in the Wi-Fi password. After connecting to the Wi-Fi, check if you can access online privileges.
Solution 2: Correct Date and Time
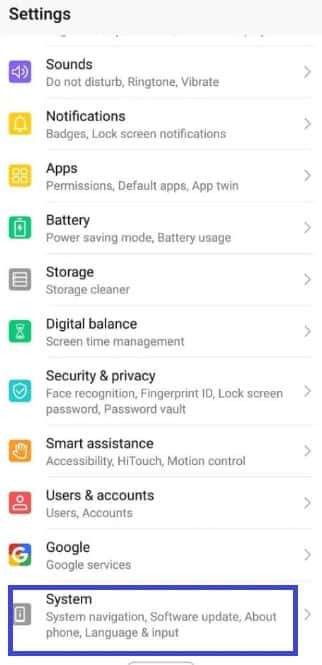
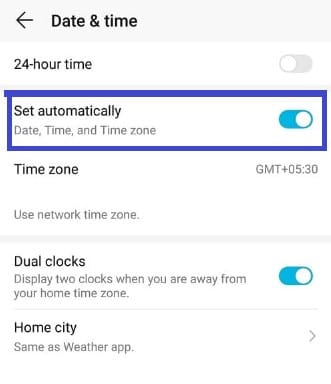
You may be experiencing difficulties connecting to the internet due to a mismatch between your phone’s date and your location’s time zone. If you have turned off “Automatic Date and Time”, you will need to set your time manually each time you are in a different time zone. This is tedious, and you can easily forget, resulting in an error. To ensure that you never experience this frustration, enable “Automatic Date and Time” by;
- Launching Settings
- Click on System
- Tap “Date and Time”
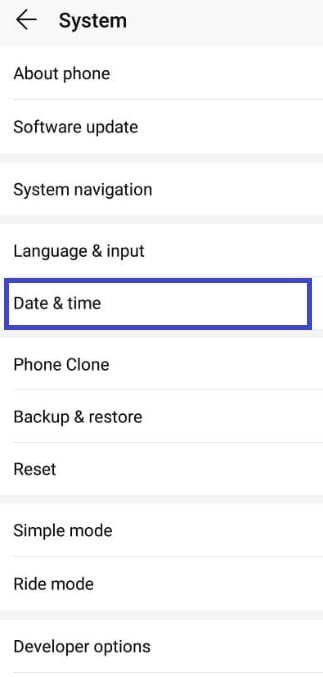
- Enable the “Set Automatically” option. Connect to your Wi-Fi to see if everything works perfectly.
Solution 3: Investigate Router Connection to the Internet
The internet connection failure can arise if the router is not internet connected. To be certain that the router is the source of the issue, connect to the Wi-Fi using another device. If you still cannot access the internet, then the router is probably the source of the failure. You can, however, try visiting another website to ascertain that you are not trying to access a blocked website.
While addressing the Wi-Fi issue;
- Check your Ethernet to ensure there are no loose connections or even no router connection
- Restart router
- If you still can’t connect to the internet, go to your ISP’s website and observe if you are logged in. if there are any errors with your credentials, correct then reconnect to the internet.
Solution 4: Reboot Router
Restarting your router is essential while troubleshooting due to connectivity issues. Restarting refreshes your settings and reconnects you to the ISP. If you have never performed this operation on any router, don’t worry because it only involves turning it off and then powering it on.
After restarting, observe the router’s lights indicating its status. These lights are critical in determining if there are connectivity errors.
Solution 5: Reset Your Android’s Device Network Settings
Your phone keeps track of changes in Network Settings anytime you make them. This technique deletes all the Network settings as well as networks. This method does not interfere with other phones’ data.
Here is a detailed procedure for resetting your device network settings:-
- Visit your phone’s settings
- Click on “System” > “Reset”.

- Tap on “Reset Network Settings”
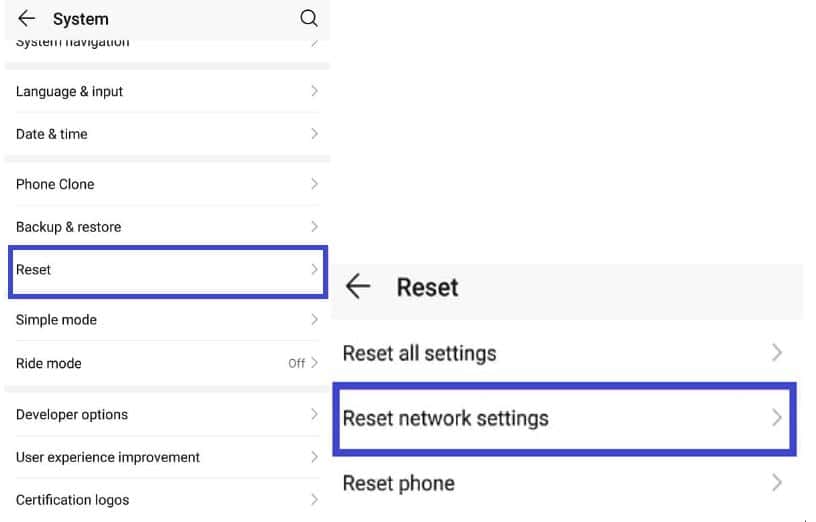
- A new display showing the settings that will be erased appears. Tap on “Reset Network Settings” to confirm the reset.
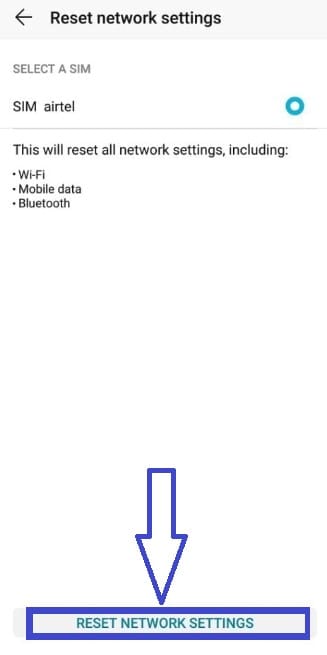
- Connect to the Wi-Fi network again, then see if you can enjoy the internet.
Solution 6: Factory Reset the Android Phone
If the above methods fail to address your concerns, use this technique. It, however, uninstalls all your apps, clears their data and deletes other crucial information in your phone, like videos. As a result, first backup your data before following these phone reset steps;
- Locate “System” after starting the Settings app.

- A prompt requesting you to back up data appears. Back up the data if you have not already performed the procedure.
- Click “Reset”
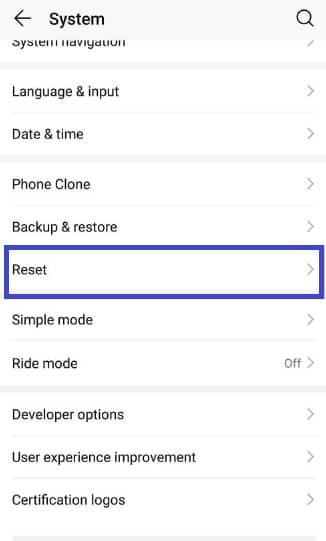
- Then click on "Phone Reset”.
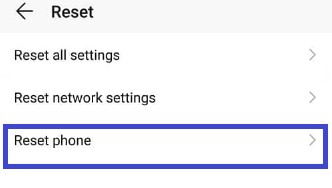
- The resetting begins. Wait until the process ends
- Connect your device to your Wi-Fi and check if there are any changes
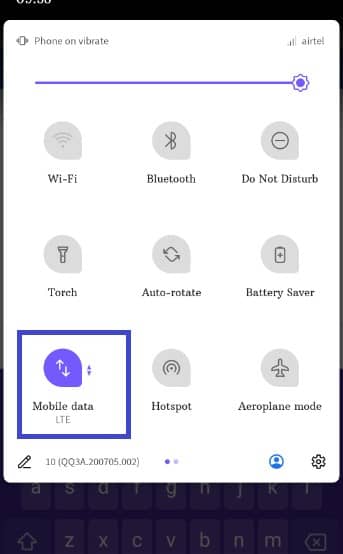
Solution 7: Disable Mobile data
Your mobile data can greatly interfere with Wi-Fi signals. To avoid interference, switch off the cellular data by doing the following;
- Open your phone’s notification panel by swiping down your screen
- Turn off cellular data by hitting “Mobile data”.
Solution 8: Confirm the Traffic Flow from Your Router
Your device can be blocked to ensure it does not access the internet over Wi-Fi. This is done by blocking your phone’s Mac address, and the internet connection issue arises.
Login to your router using your personal information and navigate to the router’s settings to view if your phone is blocked. If you don’t know your router’s login information, view them at the back of your router.
Steps:-
- Launch web browser
- Use your IP address and password to log in.
- Navigate to Settings and view blocked devices.
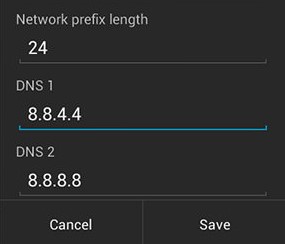
Solution 9: Edit Your DNS
Your internet connection issue could arise due to some DNS issues. To ascertain a DNS issue, type IP addresses to visit a website. If you cannot access the website, then your ISP DNS is experiencing issues.
Set Google’s DNS to fix and continue enjoying the internet. Googles DNS is (8.8.8.8; 8.8.8.4).
Steps;
- Drag your phone’s notification panel to access the drop-down menu
- View the available Wi-Fi networks by long-pressing the Wi-Fi sign

- Long-press on the name of your Wi-Fi name
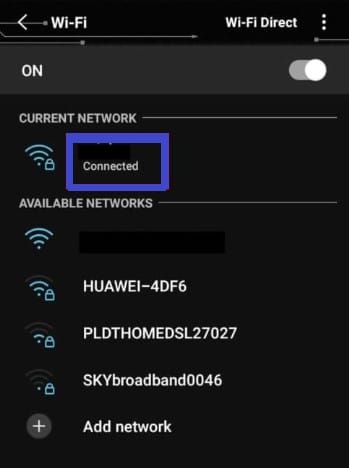
- Tap “Manage network settings”
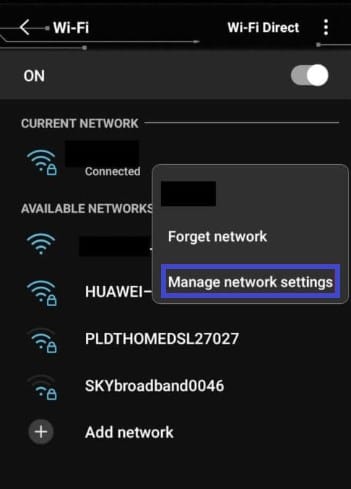
- Change IP settings to static
- Fill in the DNS 1 and DNS 2 fields.
- Hit Save
Solution 10: Reset the Router
If your problem still exists, reset your router. Resetting deletes not only ISP configurations but also network settings. After resetting, you can set up the Wi-Fi network afresh. After resetting, provide login credentials to reconnect to your ISP server.
Conclusion
In conclusion, being unable to communicate with friends, entertain yourself, search for information or perform other functions online is frustrating. If you are experiencing this issue, this post is worth your time. It outlines ten ways you can use to ensure that you continue using and accessing internet services.